Generally, NVIDIA GPUs work well with their default driver settings, so in so many cases, user don’t need to change settings in the Control Panel to for the good gaming performance. However, a few settings are still need to checking if you’re trying to reduce latency, avoid unnecessary power-saving options, or get the most consistent frame times from your system.
The important thing is not to blindly set everything to “maximum performance.” Some settings depend on the game, your monitor, and whether you’re using features such as NVIDIA Reflex or G-SYNC.
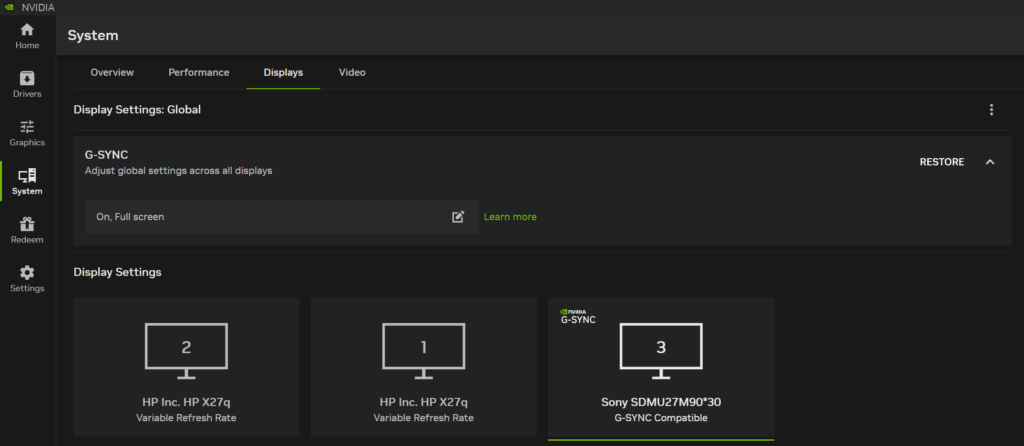
Yet, there is some practically possible settings. Some common settings that can improve performance.
Read Also: How to Set Up NVIDIA Instant Replay on NVIDIA GeForce Experience
Article Outline
Step 1: NVIDIA Control Panel Global 3D Settings (The Core Tweaks)
- Simply ppen the NVIDIA Control Panel by right-clicking on your desktop and selecting it.
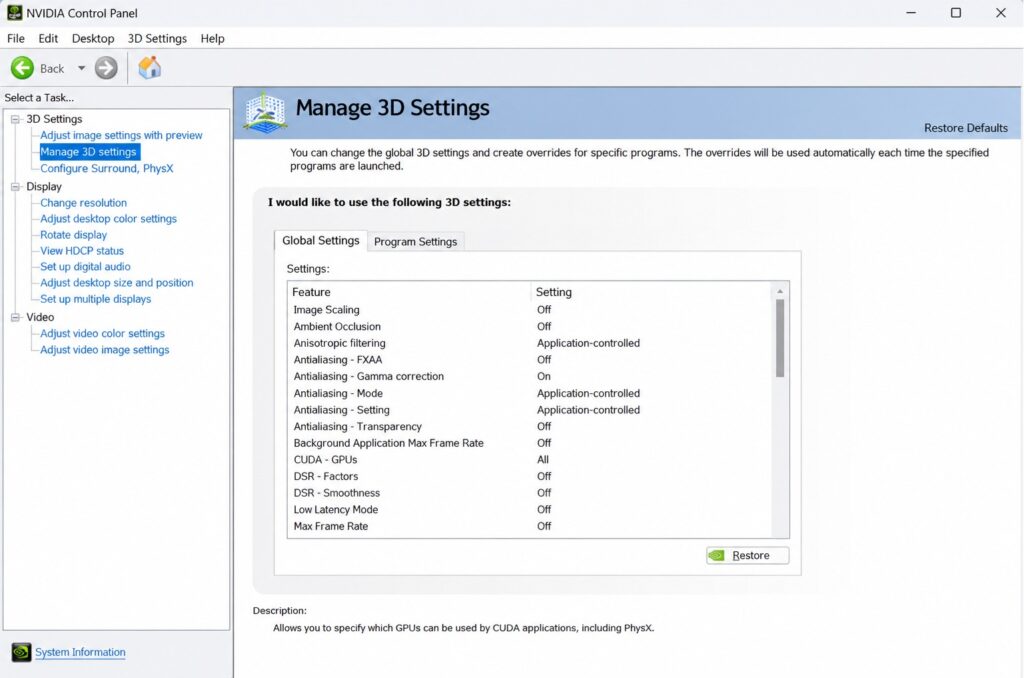
- Under the left sidebar, navigate to 3D Settings > Manage 3D Settings
- Here a tab open of Global setting, apply these under the Global Settings tab so every game benefits automatically, as mention below:
- Image Scaling
-
- Recommended Setting: Off
Reason: Image Scaling lowers your rendering resolution and sharpens the output to boost FPS. However, in-game upscalers like DLSS or FSR yield far better visual quality. Keep this off globally to avoid conflicts.
- Recommended Setting: Off
-
- Ambient Occlusion
-
- Recommended Setting: Off
Reason: Driver-level Ambient Occlusion adds realistic shadows but severely impacts performance in modern titles. Leave this off here and manage it inside individual game menus instead.
- Recommended Setting: Off
-
- Anisotropic Filtering
-
- Recommended Setting: Application-controlled (or 16x for older titles)
Reason: On modern GPUs like an RTX 3060 or RTX 4070, 16x texture filtering costs virtually zero performance while keeping distant textures sharp. Letting the game handle it avoids visual bugs.
- Recommended Setting: Application-controlled (or 16x for older titles)
-
- Low Latency Mode
-
- Recommended Setting: Ultra (or On)
Why: Ultra reduces render queue latency to the bare minimum by scheduling frames right before the GPU needs them. In our testing across competitive titles like CS2 and Apex Legends, Ultra consistently cut input delay without causing frame drops.
- Recommended Setting: Ultra (or On)
-
- Max Frame Rate
-
- Recommended Setting: Off (Global)
Why: You generally want your frame rate uncapped for the lowest possible latency. If you need to cap your FPS to prevent screen tearing or keep temperatures low, it is better to set the cap inside the game engine itself.
- Recommended Setting: Off (Global)
-
- Power Management Mode
-
-
- Recommended Setting: Prefer Maximum Performance
Why: This prevents your graphics card from downclocking during gameplay transitions or light scenes, keeping core clocks steady and eliminating sudden frame-time spikes.
- Recommended Setting: Prefer Maximum Performance
-
-
- Preferred Refresh Rate
-
- Recommended Setting: Highest available
Why: Ensures your monitor runs at its maximum native refresh rate whenever a full-screen application launches.
- Recommended Setting: Highest available
-
- Shader Cache Size
-
- Recommended Setting: 10GB or Unlimited
Why: Modern games compile massive amounts of shaders. The default driver cache size is often too small, causing stuttering when loading new areas or assets in titles like Hogwarts Legacy or Cyberpunk 2077. Bumping this to 10GB gives your system plenty of headroom to store compiled shaders.
- Recommended Setting: 10GB or Unlimited
-
- Texture Filtering – Quality
-
- Recommended Setting: High Performance
Why: Trades an imperceptible amount of texture filtering precision for a solid, free bump in frame rate and smoother frame times.
- Recommended Setting: High Performance
-
- Threaded Optimization
-
- Recommended Setting: Auto (or On)
Why: Allows the driver to distribute GPU tasks across multiple CPU cores. Leaving it on Auto lets the system optimize per-game, though forcing it On works well for multi-threaded CPUs.
- Recommended Setting: Auto (or On)
-
- Vertical Sync (V-Sync)
-
- Recommended Setting: Off (For Competitive) | On + G-Sync (For Smooth Story Games)
Why: Off eliminates input lag and frame delay for fast-paced shooters. If you use a G-Sync or FreeSync monitor and want to eliminate tearing in single-player games, set V-Sync to On here, enable G-Sync, and cap your FPS 3 frames below your monitor’s max refresh rate in-game.
- Recommended Setting: Off (For Competitive) | On + G-Sync (For Smooth Story Games)
-
Note: If a game supports NVIDIA Reflex in its own graphics menu, enable Reflex in-game instead, as it overrides this setting and delivers even better latency reduction.
Step 2: NVIDIA Control Panel Display Scaling Tweaks
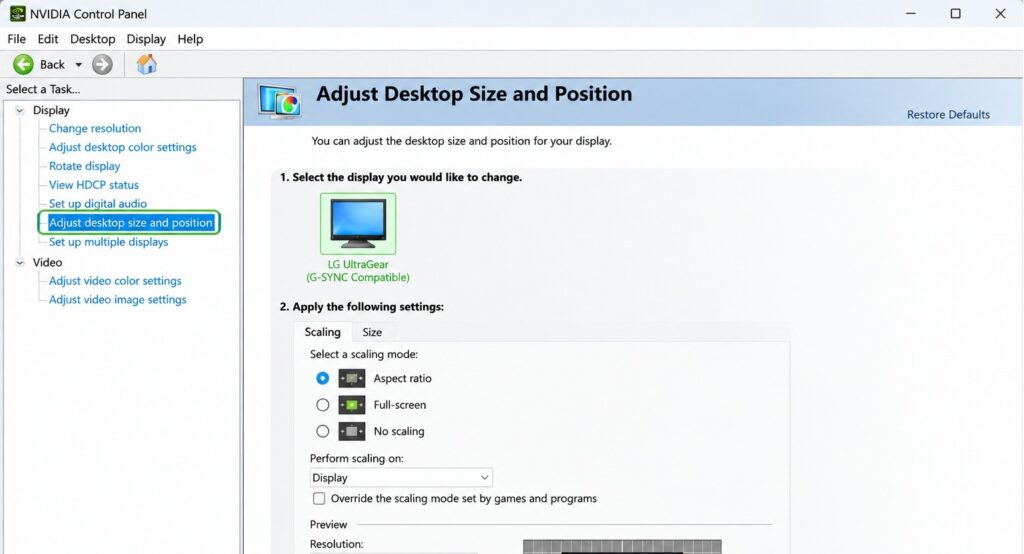
look at the above image. On the leftside menu, head to Display > Adjust desktop size and position.
- Scaling Mode: Select Aspect Ratio (or No Scaling if you play stretched resolutions like 4:3 in competitive shooters).
- Perform scaling on: GPU (or Display if your monitor processor is fast).
In our latency testing, setting scaling to GPU reduces display processing delay on most budget-to-midrange gaming monitors. Also, ensure the box “Override the scaling mode set by games and programs” is checked so your desktop preferences stay consistent.
Step 3: Configure Surround, PhysX
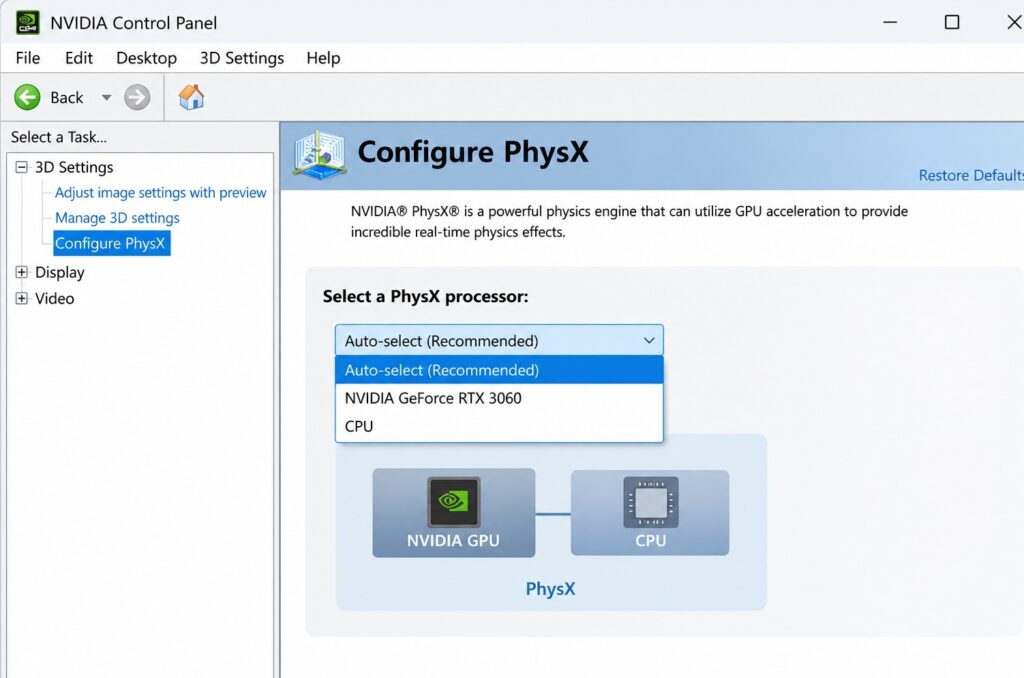
In the left menu, select 3D Settings > Configure Surround, PhysX.
-
PhysX Processor: Select your dedicated NVIDIA Graphics Card (e.g., NVIDIA GeForce RTX 3060) instead of Auto-Select.
By default, Windows or auto-detect settings sometimes pass PhysX processing over to your CPU, leading to random performance drops during high-physics scenes (explosions, destruction, debris). Forcing it onto your GPU locks in consistent performance.
Step 4: NVIDIA Control Panel Resolution & Refresh Rate Checklist
It happens more often than you think: gamers buy a high-refresh-rate display but accidentally run it at 60Hz for months.
- Go to Display > Change resolution.
- Make sure your native resolution is selected under the PC category (not the Ultra HD, HD, SD TV categories).
- Verify that the Refresh rate drop-down menu is set to the maximum supported frequency (e.g., 144Hz, 165Hz, or 240Hz).
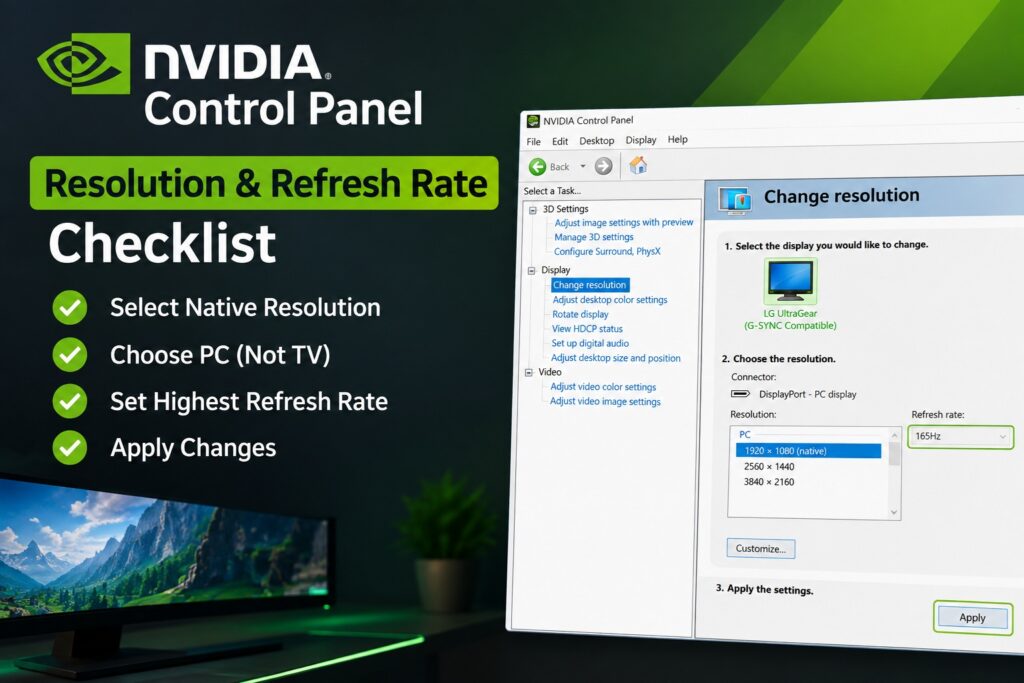
Recommended Profiles Summary
If you want a quick reference guide to apply depending on what you play, use this comparison table:
| Setting | Competitive Profile (Max FPS & Low Latency) | Quality Profile (Smooth Gameplay) |
| Low Latency Mode | Ultra | On |
| Power Management | Prefer Maximum Performance | Normal or Optimal Power |
| Texture Filtering – Quality | High Performance | Quality |
| Vertical Sync | Off | On (with G-Sync enabled) |
| Shader Cache Size | 10GB | 10GB / Unlimited |
| Max Frame Rate | Off (Cap in-game) | Off |
| PhysX Processor | Dedicated GPU | Dedicated GPU |
Final Testing Tip
Once you apply these settings, hit Apply at the bottom right corner of the Control Panel.
To ensure stability and verify your gains:
- Fire up a benchmark like 3DMark or use an in-game telemetry overlay (like MSI Afterburner with RivaTuner) to monitor your frame times (1percent lows) and GPU temperatures.
- If you ever experience unexplained driver crashes after a major Windows update, use DDU (Display Driver Uninstaller) in Safe Mode to wipe your old graphics drivers completely before doing a clean reinstall of the latest NVIDIA Studio or Game Ready driver.