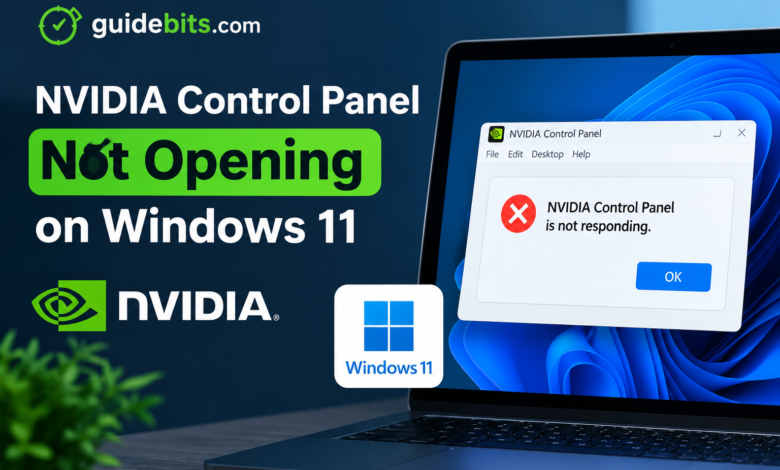
You right-click your desktop, select NVIDIA Control Panel, and nothing happens. Or maybe the loading wheel spins for half a second before vanishing into thin air. This is one of the most common issues that NVIDIA Control Panel Not Opening on Windows 11. In most cases we see on laptops and desktop rigs alike, the culprit isn’t a dead graphics card. Instead, it’s usually a hung background process, a broken Windows 11 DCH driver component, a stopped system service, or Fast Startup loading a corrupted driver state into memory during boot.
Here is how to troubleshoot and fix the NVIDIA Control Panel when it refuses to open on Windows 11.
Interesting Tips to Install Android Apps on Windows 11
Article Outline
- 1 Quick Fix 1: Optimize Background Processes & Restart as Administrator
- 2 Quick Fix 2: Restart NVIDIA Core Services
- 3 Quick Fix 3: Reinstall NVIDIA Control Panel App from Microsoft Store
- 4 Hidden Fixes That Most Tutorials Skip
- 5 Quick Fix 4: Perform a Clean GPU Driver Reinstall (Using DDU)
- 6 Quick Fix 5: Disable Fast Startup in Windows 11
- 7 ⚡ Quick Note Matrix: NVIDIA Control Panel Not Opening
Quick Fix 1: Optimize Background Processes & Restart as Administrator
Sometimes the app is actually running in the background, frozen in an invisible state. When you try to launch it again, Windows ignores your click because it thinks the instance is already active.
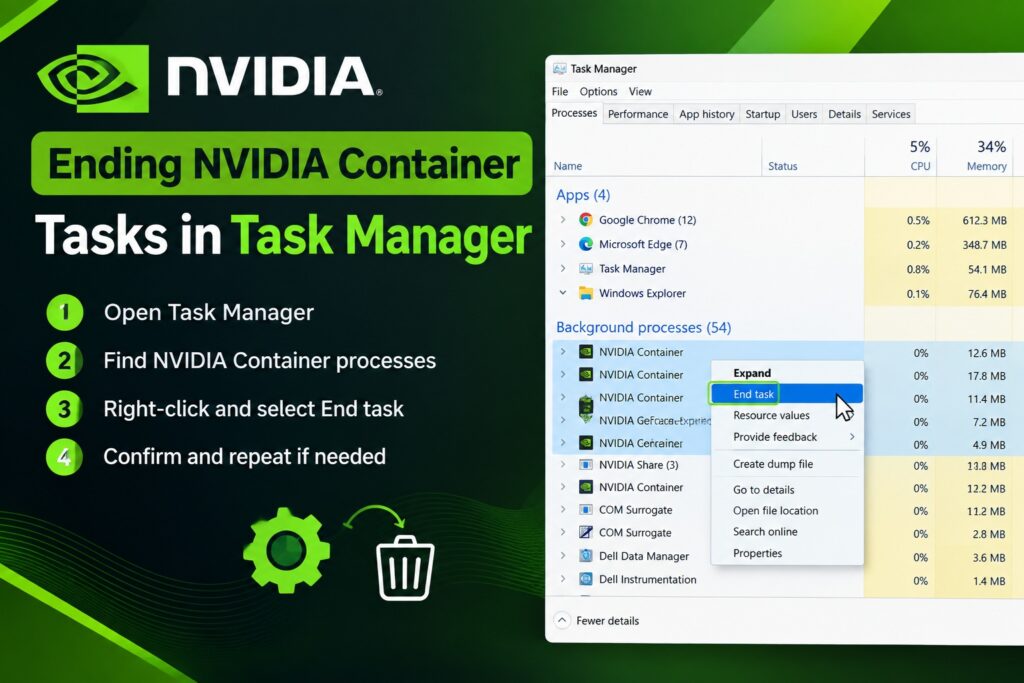
- Press
Ctrl + Shift + Escto open Task Manager. - Look through the Processes tab for any instances of NVIDIA Control Panel or NVIDIA Container.
- Right-click each process and select End task.
- Now, open File Explorer and navigate directly to the app directory:
C:\Program Files\NVIDIA Corporation\Control Panel Client\
Findnvcplui.exe, right-click it, and select Run as administrator.
If a frozen process was blocking the app, forcing it to launch as administrator bypasses the hang immediately.
Quick Fix 2: Restart NVIDIA Core Services
The Control Panel relies on dedicated background services to load its display and 3D settings menus. If these services fail to start when Windows 11 boots up, the Control Panel won’t respond.
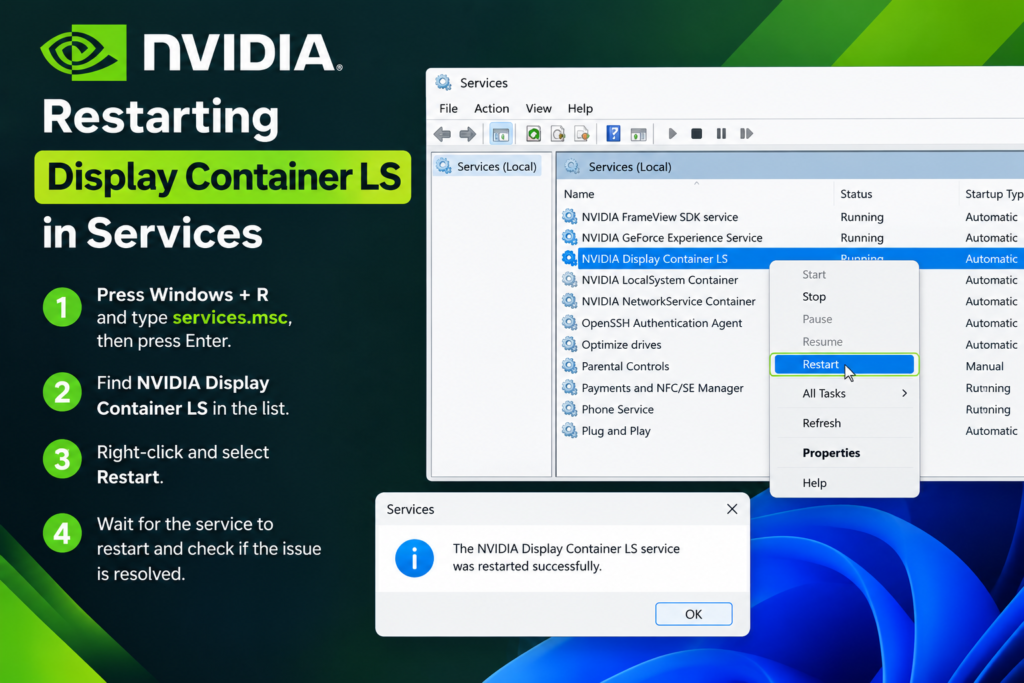
- Press
Win + Rto open the Run dialog box, typeservices.msc, and hit Enter. - Scroll down until you find NVIDIA Display Container LS and NVIDIA LocalSystem Container.
- Right-click NVIDIA Display Container LS and hit Restart (if it isn’t running, click Start).
- Double-click the service, check the Startup type drop-down, and set it to Automatic.
- Click Apply and then OK. Repeat these exact steps for the NVIDIA LocalSystem Container service if present on your machine.
Try launching the app again from your desktop right-click menu.
Quick Fix 3: Reinstall NVIDIA Control Panel App from Microsoft Store
Modern Windows 11 systems use DCH (Declarative Componentized Hardware) drivers. Under this architecture, the graphics driver installs separately from the Control Panel user interface, which operates as a standalone Universal Windows Platform (UWP) app.
If the UWP app interface gets corrupted during a Windows Update, reinstalling it takes two minutes:
- Press
Win + Ito open Settings and go to Apps > Installed apps. - Search for NVIDIA Control Panel in the search bar.
- Click the three dots next to the app, select Advanced options, and click Reset.
- If resetting doesn’t work, go back, click the three dots, and select Uninstall.
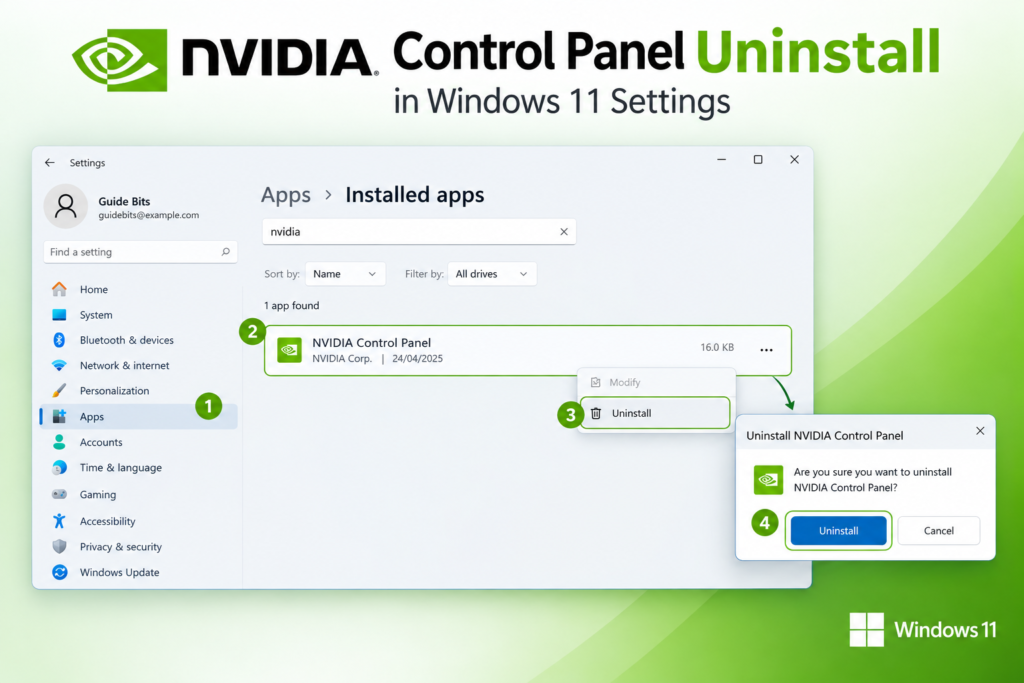
Reinstall NVIDIA Control Panel App from Microsoft Store - Open the Microsoft Store, search for NVIDIA Control Panel, and click Get or Install. Once installed, attempt to launch it directly from your Start Menu, click here to know complete method
Hidden Fixes That Most Tutorials Skip
Standard troubleshooting guides usually stop at restarting services or reinstalling drivers. However, Windows 11 introduces unique architecture quirks—especially on gaming laptops and systems with strict security policies—that require a more targeted approach.
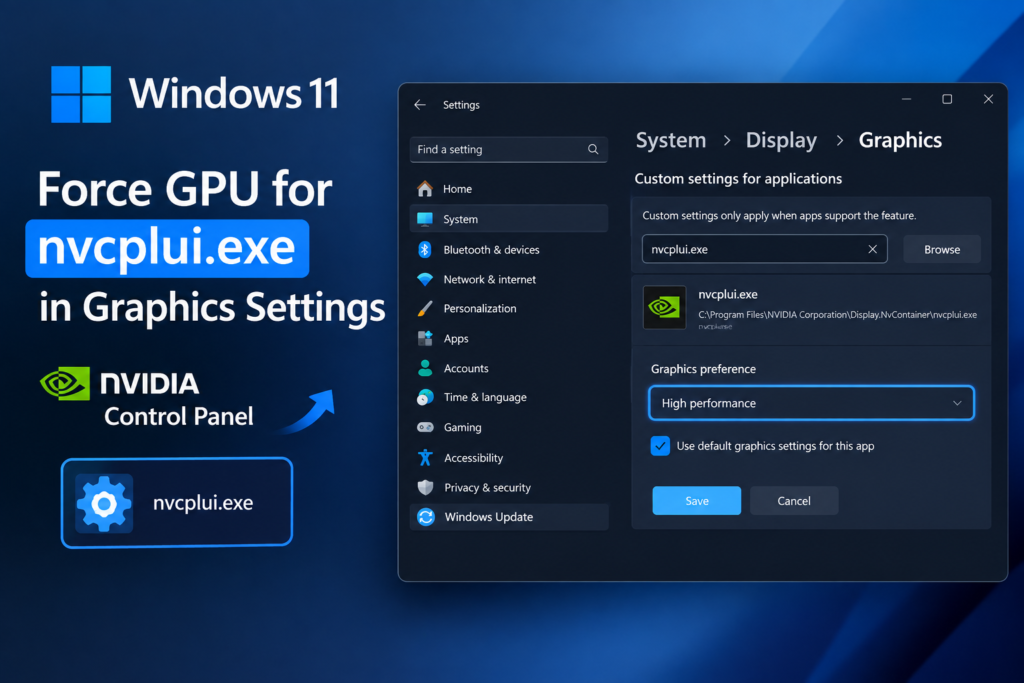
1. Force High Performance for Hybrid Laptops (Optimus Glitch)
If you are on a laptop with dual graphics (Intel/AMD integrated graphics alongside a dedicated NVIDIA GPU), the Control Panel often fails to launch because Windows defaults the Control Panel interface to the low-power integrated GPU.
- Go to Settings > System > Display > Graphics.
- Click Browse, navigate to
C:\Program Files\NVIDIA Corporation\Control Panel Client\, and addnvcplui.exe. - Click Options, set it to High Performance (forcing it to use your NVIDIA GPU), and click Save.
2. Bypass Windows Shell with a Direct Shortcut
Opening the Control Panel from the desktop right-click context menu relies on Windows Shell extensions that frequently lock up after major Windows 11 cumulative updates.
- Right-click an empty space on your desktop, go to New > Shortcut.
- Paste the exact location:
"C:\Program Files\NVIDIA Corporation\Control Panel Client\nvcplui.exe" - Name it NVIDIA Control Panel and click Finish.
- Right-click your new shortcut, go to Properties > Advanced, check Run as administrator, and hit Apply.
Using this shortcut launches the executable directly, bypassing any corrupted Windows context menu scripts.
3. Check Windows 11 Memory Integrity (Core Isolation Conflict)
Windows 11 includes a virtualization-based security feature called Memory Integrity (HVCI). On rare occasions, an updated Windows security layer silently blocks older background container drivers from initializing.
- Open Windows Security from your system tray.
- Navigate to Device Security > Core isolation details.
- If the Control Panel stopped opening immediately after a security update, try toggling Memory Integrity to Off and restart your system to test if a security driver conflict is blocking the application.
Quick Fix 4: Perform a Clean GPU Driver Reinstall (Using DDU)
If restarting services and resetting the app fails, you are likely dealing with corrupted registry keys or conflicting driver files left over from previous updates. The cleanest way to wipe the slate clean is by using Display Driver Uninstaller (DDU).
Steps to Fix NVIDIA Control Panel Not Opening on Windows 11
Step 1: Download Your Files
First, download the latest Game Ready Driver for your specific GPU directly from NVIDIA’s official website. Next, download the free Display Driver Uninstaller (DDU) utility from Wagnardsoft.
Step 2: Boot into Safe Mode
- Hold down the
Shiftkey while clicking Restart in your Windows Start Menu. - Go to Troubleshoot > Advanced options > Startup Settings and click Restart.
- Press
4orF4to boot into Safe Mode.
Step 3: Run DDU and Reinstall
- Open DDU, select GPU on the right drop-down, and choose NVIDIA.
- Click Clean and restart. DDU will strip every trace of old NVIDIA drivers, registry entries, and cached files.
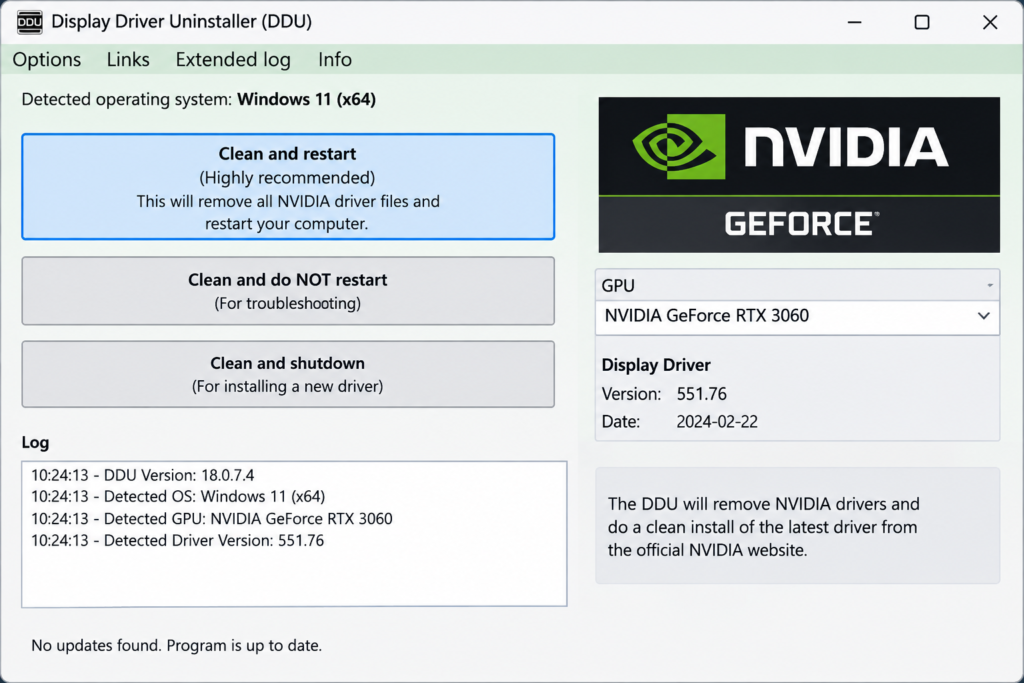
DDU interface showing Clean and Restart option - Once Windows boots back up normally, launch the NVIDIA installer you downloaded earlier.
- Select NVIDIA Graphics Driver and GeForce Experience (or Driver only), choose Custom (Advanced) installation, and check the box marked Perform a clean installation.
Once the setup completes, your right-click context menu and Control Panel app will function normally again.
Quick Fix 5: Disable Fast Startup in Windows 11
During our testing on fresh Windows 11 builds, we noticed that the Fast Startup feature can cause random driver service timeouts. Fast Startup puts your PC into a hybrid hibernation state instead of doing a full shutdown, which sometimes reloads corrupted service states when you turn your PC back on.
- Press
Win + R, typecontrol, and press Enter to open the classic Control Panel. - Navigate to Power Options (set “View by” to Large icons).
- Click Choose what the power buttons do on the left menu.
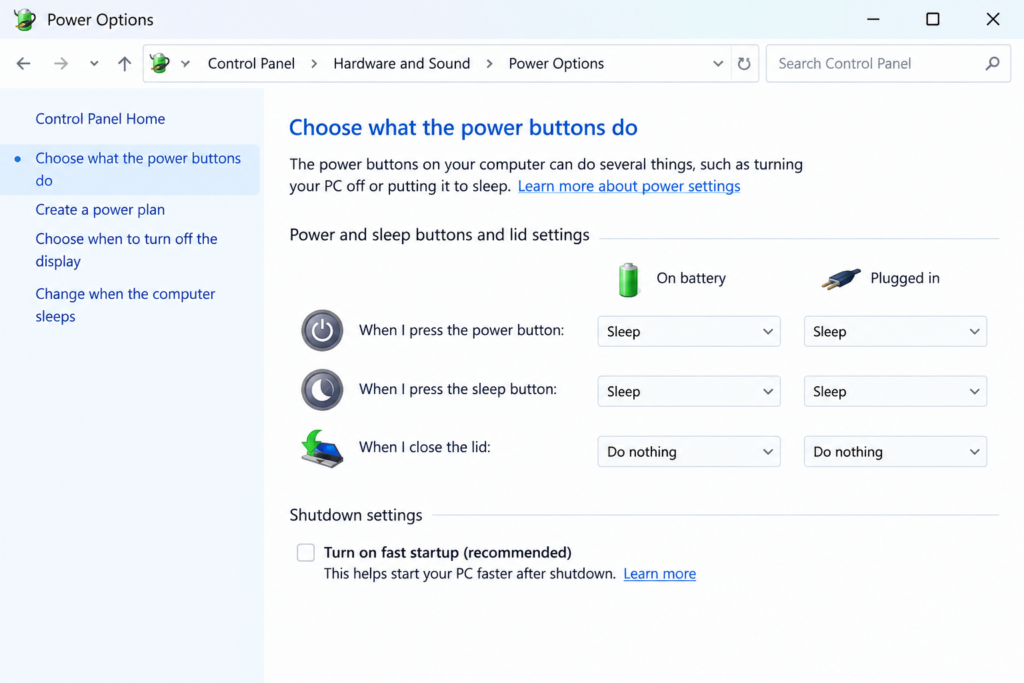
Power Options Choose what the power buttons do - Click the link that says Change settings that are currently unavailable.
- Uncheck Turn on fast startup (recommended).
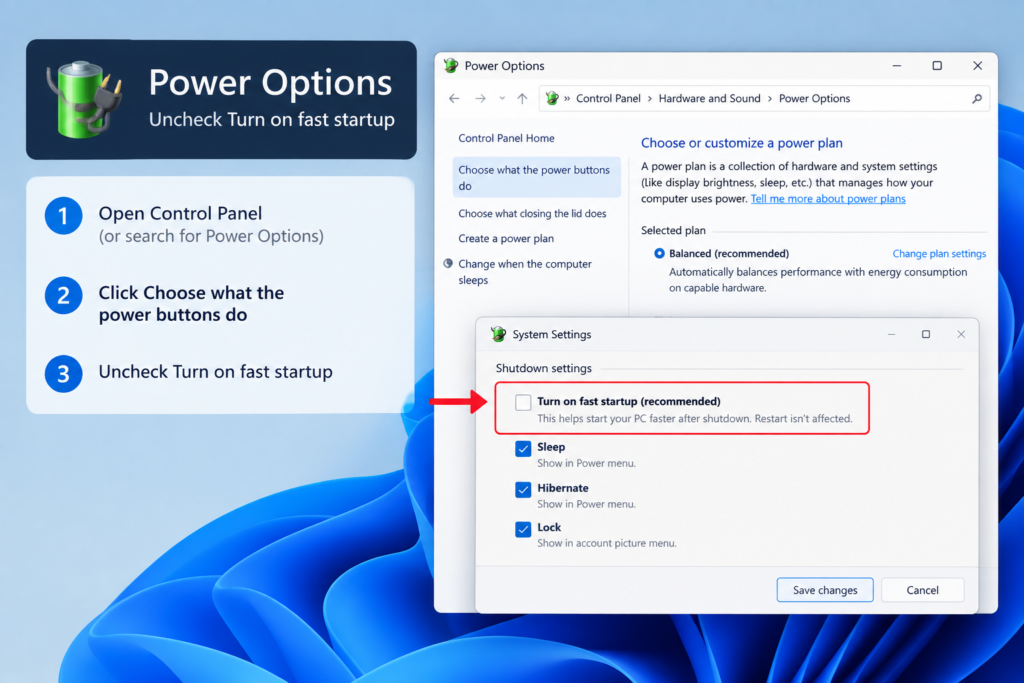
Unchecking Turn on fast startup in Windows Power Options - Click Save changes and restart your computer.
Disabling this forces Windows 11 to reload all hardware drivers and core display services fresh every time you power on your machine.
Pro Tip: Once you get the app running properly, check out our full setup guide on NVIDIA Control Panel Best Settings for Gaming & High FPS to maximize your graphics card’s performance and eliminate frame stutters.
⚡ Quick Note Matrix: NVIDIA Control Panel Not Opening
There is a quick note of Guide to Fix NVIDIA Control Panel Not Opening on Windows 11
| Status / Symptom | Primary Cause | 🛠️ Actionable Fix Method | Difficulty / Time |
| 🥶 Silent Freeze / No Response | Hung background process |
Force-Kill & Admin Launch
|
🟢 Easy
(1 Min) |
| 🔍 Missing Right-Click Option | Stopped display service |
Restart Container Services
|
🟢 Easy
(2 Mins) |
| 💻 Laptop / Dual-GPU Glitch | Integrated GPU conflict |
Force Dedicated GPU Assignment
|
🟡 Medium
(2 Mins) |
| 💥 App Instantly Closes | Corrupted Store package |
Reset / Reinstall via Microsoft Store
|
🟡 Medium
(3 Mins) |
| 🛑 Context Menu Failure | Windows Shell script lock |
Bypass Shell via Direct Shortcut
|
🟢 Easy
(2 Mins) |
| 🔄 Random Boot Timeouts | Windows 11 hybrid sleep |
Disable Fast Startup
|
🟢 Easy
(2 Mins) |
| 🚨 Persistent Crash Loop | Corrupted driver registry |
Nuclear Option: Clean DDU Wipe
|
🔴 Advanced
(10 Mins) |