Best NVIDIA Control Panel Settings for Gaming Laptops (Battery vs. Performance)

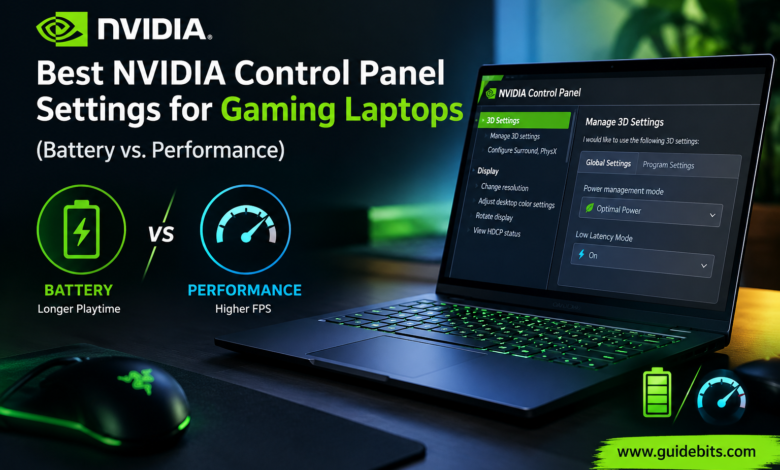
Desktop GPUs operate with massive heatsinks, high-airflow desktop towers, and an unlimited supply of wall power. Gaming laptops, on the other hand, share a cramped chassis where the CPU and GPU often sit on a shared heatpipe array. When you push a mobile GPU inside a thin chassis, heat builds up quickly, fans sound like jet engines, and performance throttles to save the hardware from cooking itself. Unplug that same laptop from the power brick, and the battery drains in less than an hour if your software configuration forces the dedicated graphics card to pull maximum wattage. The goal of this guide is straightforward: Configure the Best NVIDIA Control Panel Settings to unlock peak FPS and low temperatures when plugged in, and set up a smart, balanced profile when you need to run games on battery power.
Read Also: NVIDIA Control Panel Not Opening on Windows 11
Understanding the Laptop Dilemma (Plugged-In vs. Battery)
Gaming laptops rely on display-switching technologies like NVIDIA Optimus or Advanced Optimus. These systems route display signals between your processor’s low-power Integrated Graphics (Intel UHD/Iris Xe or AMD Radeon Graphics) and your high-power dedicated NVIDIA GeForce RTX card.
[ PLUGGED IN MODE ]  --->  Dedicated NVIDIA GPU  --->  Maximum Power / High FPS
[ BATTERY MODE    ]  --->  Integrated Graphics  --->  Display / Battery Saver
If you copy desktop-centric NVIDIA Control Panel Settings directly onto a mobile platform, your GPU stays locked in high-power states even during light tasks. The result?
- Excessive idle fan noise
- Thermal throttling during extended gaming sessions
- Rapid battery degradation
A gaming laptop needs two distinct operating strategies: one for raw desktop-class performance at your desk, and another for silent, power-conscious gameplay when mobile.
Profile 1: Plugged-In Max Performance Settings (High FPS & Cool Temps)
When your laptop power brick is connected to the wall, power delivery is no longer an issue. However, heat management remains your biggest performance bottleneck. Setting your GPU to run unnecessarily hot causes core clock speeds to drop during heavy firefights.
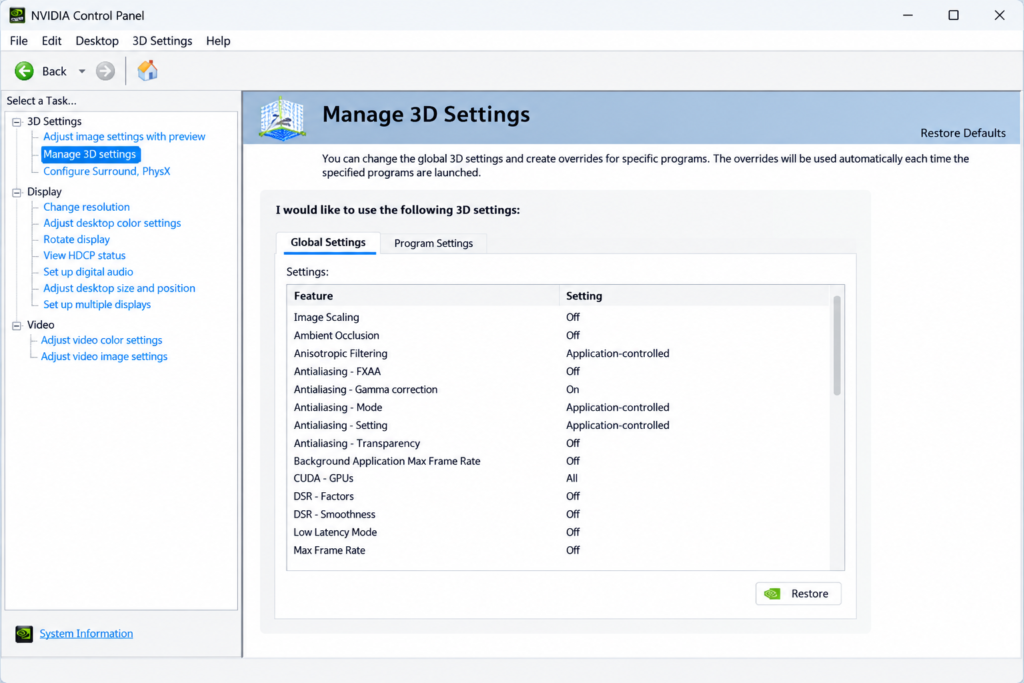
Open your NVIDIA Control Panel, navigate to 3D Settings > Manage 3D Settings, and adjust these core values under the Global Settings tab:
Preferred Graphics Processor
- Setting: High-performance NVIDIA processor
Reason: Forces demanding applications to hook directly into your dedicated GPU rather than defaulting to integrated graphics.
Power Management Mode
- Setting: Optimal Power (or Normal)
- Reason: Many guides blindly recommend setting this to “Prefer Maximum Performance”. On desktop PCs, that is fine. On laptops, leaving this on Maximum Performance forces the GPU core and memory clocks to run at maximum frequency constantly—even while sitting on your Windows desktop. This dumps extra heat into your shared cooling pipes before you even launch a game. Optimal Power allows the GPU to instantly boost to maximum clocks under load while letting it drop to cool idle states when browsing.
Low Latency Mode
- Setting: On (or Ultra if CPU-bound)
- Reason: Limits the frame queue submitted by the CPU to the GPU, dropping rendering latency. In our testing across Lenovo Legion and ASUS ROG models, setting this to On keeps input lag minimal without introducing frame pacing stutters in heavy AAA games.
Shader Cache Size
- Setting: 10GB
- Reason: The default driver cache is often too small for modern titles like Cyberpunk 2077 or Hogwarts Legacy. Setting this to 10GB pre-compiles and stores shaders on your SSD, virtually eliminating asset-loading micro-stutters during rapid map movement.
Max Frame Rate
-
Setting: Off (or set 3 FPS below display refresh rate if using G-SYNC)
Reason: If your display is 144Hz and your GPU pushes 200 FPS in an older title, those extra 56 frames are completely wasted visual energy. Capping your framerate slightly below your panel’s peak refresh rate prevents thermal saturation and keeps G-SYNC engaged.
Texture Filtering – Quality
- Setting: High Performance
Reason: Offloads minor rendering pipelines, giving you a slight boost in raw frametime stability with zero visible loss in graphical clarity.
Profile 2: Battery Saver Gaming Settings (On-the-Go Optimization)
Attempting to play fast-paced 3D titles on battery power without software limits will drain a 99Wh laptop battery in under 45 minutes while causing severe stuttering as the battery controller limits system wattage.
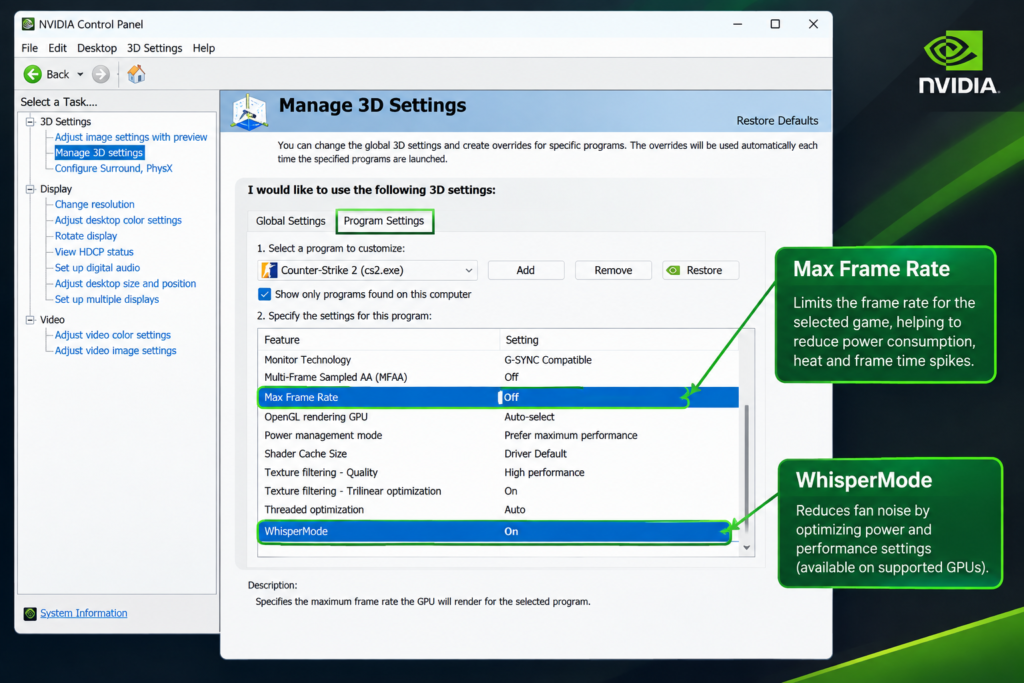
When unplugged from the wall brick, switch your focus from benchmark scores to game duration and acoustics using these targeted NVIDIA Control Panel Settings:
Read Also: NVIDIA Control Panel Best Settings for Gaming & High FPS
Max Frame Rate Cap (Manual Battery Lock)
- Setting: 30 FPS or 60 FPS
- Where: Navigate to Manage 3D Settings > Program Settings, select your specific game executable, and turn on Max Frame Rate.
- Why: Running a game at 30 FPS or 45 FPS on battery power cuts GPU power draw by up to 50%, doubling your usable playtime while maintaining a playable frame rate.
WhisperMode / Battery Boost Integration
- Setting: Enabled (configured via NVIDIA GeForce Experience / NVIDIA App and refined in Control Panel)
Reason: NVIDIA’s driver level BatteryBoost feature dynamically limits frame pacing and caps power draw to match your target framerate.
Power Management Mode (On Battery)
- Setting: Optimal Power
Reason: Ensures the GPU drops down to minimal voltage steps the instant a frame finishes rendering.
CUDA – GPUs
- Setting: All
Reason: Leaves all available GPU compute cores active so the hardware can finish processing workloads as fast as possible before dropping back to low-power sleep states (“race-to-sleep” architecture).
Step 2: Display & Resolution Optimization for Laptop Screens
Laptops handle scaling differently than desktop displays. Incorrect display pipeline routing can add a frame or two of input lag or cause blurred desktop text.
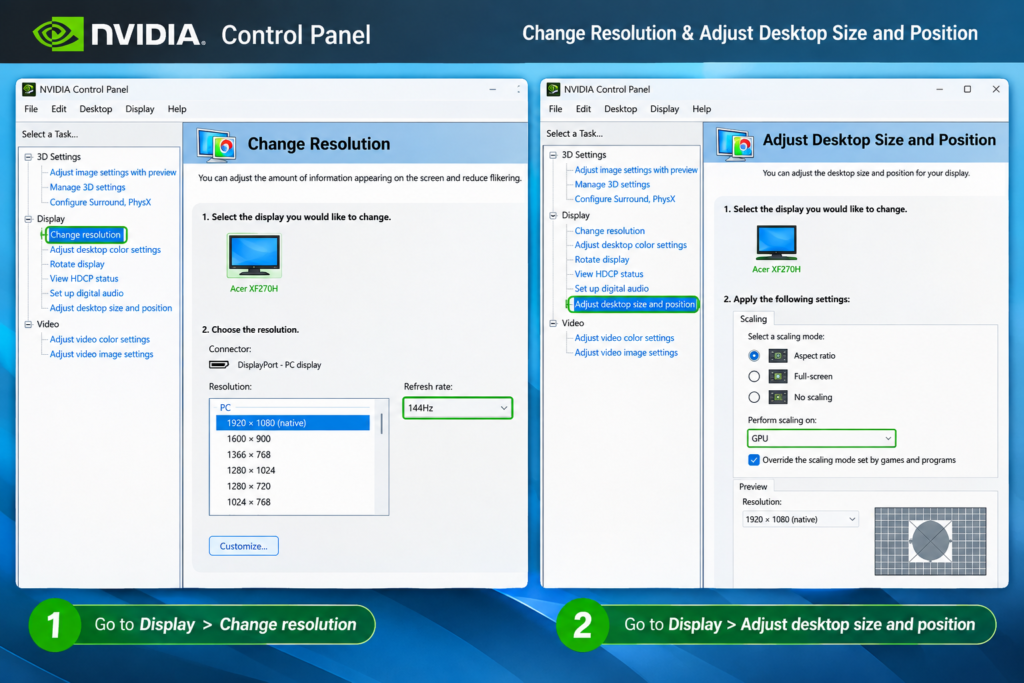
Display Scaling Pipeline
- Open the NVIDIA Control Panel.
- Expand the Display menu on the left sidebar.
- Click on Adjust desktop size and position.
- Under Perform scaling on:, select Display (if available) or GPU.
- Check the box for Override the scaling mode set by games and programs.
Note: If you only see 3D Settings in your left sidebar, your laptop is currently running in Hybrid/Optimus mode where the integrated graphics card handles display outputs. To reveal the full Display menu, switch your laptop to “Discrete GPU Only” mode via your laptop’s MUX Switch or Advanced Optimus settings.
Verify Panel Refresh Rate
Always double-check Display > Change Resolution. High-refresh laptop panels (144Hz, 240Hz, or 360Hz) often drop to 60Hz when unplugged to save power. When you plug back into the wall, verify that the Refresh rate dropdown is manually set back to your panel’s maximum rated frequency.
Comparison Matrix: Plugged-In vs. Battery Settings Summary
| Setting Feature | Plugged-In (Max FPS & Cool Temps) | Battery Saver (Extended Playtime) |
| Preferred Graphics Processor | High-performance NVIDIA processor | Auto-select / Integrated (for non-gaming) |
| Power Management Mode | Optimal Power | Optimal Power |
| Max Frame Rate | Off (or 3 FPS below screen refresh) | Locked to 30 FPS or 60 FPS |
| Low Latency Mode | On / Ultra | Off |
| Shader Cache Size | 10GB | 10GB |
| Texture Filtering – Quality | High Performance | High Performance |
| BatteryBoost / WhisperMode | Disabled | Enabled (30-60 FPS Target) |
| Display Scaling | Performed on Display / GPU | Performed on Display |
Helpful Resources for Best NVIDIA Control Panel Settings
Experiencing missing tabs or laptop display issues? Check our guide on [How to Fix NVIDIA Control Panel Options Missing] or our main guide on [NVIDIA Control Panel Best Settings for Gaming & High FPS].
Final Thermal & Testing Tip
Applying the Best NVIDIA Control Panel Settings is only half the battle; real-world testing validates your adjustments.
After applying these profiles, download a hardware monitoring tool like HWiNFO64 or MSI Afterburner. Run a demanding game for 20 minutes while plugged in and observe your GPU Temperature and GPU Memory Junction Temperature.
If your GPU temperatures stay under 83°C, your thermal headroom is healthy, and your laptop will maintain its maximum boost clocks without throttling down mid-game. If you hit thermal walls, re-verify that your Power Management Mode is set to Optimal Power rather than Prefer Maximum Performance to reduce unnecessary voltage delivery.